
Introduction
In this post, we will learn how to call a REST API in SSIS, which requires an OAuth 2.0 Client Credentials Grant Type.
To learn more about other OAuth 2.0 Grant Types in SSIS, check this post
In Client Credentials Grant Type, you don't need to click Generate Token on the SSIS OAuth connection manager UI. Basically, when you call the API, it will go to the Token URL and request a new token each time before any API call. It will use ClientID and ClientSecret to authenticate your request to get a new token. Once the token is obtained, it will be used automatically for any API calls made by tasks like SSIS REST API Task or SSIS JSON Source
How to call REST API in SSIS using OAuth 2.0 Client Credential Grant (Bronto API Example)
Let's look at some examples of calling API in SSIS using OAuth 2.0 Client Credential Grant (We will use Bronto API as an example)( https://help.bronto.com/bmp/reference/r_api_rest_orders_add.html - See Java Code on that page)
- We assume you already have SSIS PowerPack Installed. If not, Download From Here (It's free for Visual Studio).
- After SSIS PowerPack is installed. Open Visual Studio to create a new SSIS Package
- Drag the ZS REST API Task from the toolbox. Double-click it to edit
- Select Mode to URL from Connection
- Now, click New OAuth Connection and configure it as below, and click OK, and now you're ready to call the API using the OAuth Client Credential Grant
NOTE: If you use Client Credential Grant Type, then no need to click Generate Token on SSIS OAuth Connection Manager
Advanced Tab
In some cases, when obtaining an access token, you may need to include additional parameters or attributes in the token request. This could involve specifying a particular content type or adding custom authentication headers. The Advanced Tab allows you to configure these extra settings to ensure your token request is processed correctly.
OAuth2 Grant Options Tab
The OAuth2 Grant Options Tab allows you to configure how credentials are sent when making a token request. Depending on your API requirements, you can choose to pass credentials in the header or in the body, or even opt not to include them at all. Additionally, some APIs may return the access token under a different field name instead of the default access_token. You can specify that field name here to ensure the token is correctly captured.
If you encounter a 401 Unauthorized error or other issues while testing the connection, you can try adjusting the settings by selecting Do not include credentials in header or body. This often resolves authentication errors, depending on how your API expects the credentials.
Caching tokens (System-wide / multiple threads)
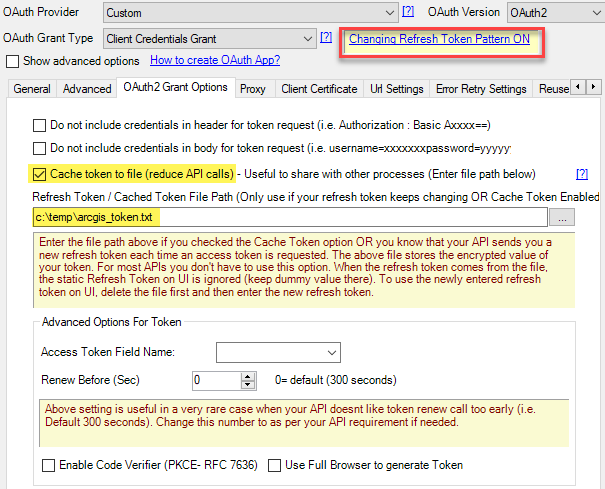
By default, each connection generates a new token. If you’re making repeated calls in a loop, you might notice that multiple tokens are created within a short time. To avoid this, you can enable token caching. This allows the same token to be reused across requests, significantly reducing the number of token renewal operations.
To cache the token, perform the following steps
- Go to the OAuth2 Grant Options Tab
- Check the Cache token to file option
- Enter the Refresh Token / Cached Token File path. If the path is already prepopulated, then enter it where the token file will be saved.
Contact Us
If you have any further questions, feel free to reach out to us via Live chat.
Comments
0 comments
Please sign in to leave a comment.